Logon Automator User's Guide
Introduction
 View Instruction Video View Instruction Video
|
Let us introduce you to Logon Automator. Logon Automator does all of the above and more! You will have no more trouble keeping track of your user names and passwords. Your logon process to different web sites will be reduced to a click of the mouse. Here are some highlights of what Logon Automator can do for you:
- Automatically logs on to multiple web sites simultaneously with a click of a button. All you need to remember is the master password to log on to Logon Automator. It will remember all your user names and passwords, and log on for you.
- Encrypts your passwords using US-Government-approved Triple DES (Data Encryption Standard) encryption algorithm so that no one will be able to view your passwords without your permission.
- Stores and organizes all your user names and passwords in one single secured location on your computer.
- Prevents key logger spyware from recording your key strokes since logon is performed with a mouse click.
- Remembers not just the user names and passwords on the logon page, but any options selected as well.
- Replaces all the links in your "Favorites" folder in Internet Explorer. You can move the links from "Favorite" folder to Logon Automator and it will click on all the links for you with one click of the button.
- Has the ability to automatically run any Windows programs on your computer.
- Provides a password generator to generate strong and difficult-to-guess passwords.
- Prints out all your logon information on screen or to paper when needed.
- Does not clutter up your Internet Explorer’s toolbars since it is not a plug-in to your browser.
Installation
The installation file LogonAutomatorSetup.exe can be downloaded from our Download page. After you have downloaded the LogonAutomatorSetup.exe file to your computer, double-click on it to start the installation process.Logon Automator requires Microsoft .Net Framework 2.0 to run on your computer. If you have not installed Microsoft .Net Framework 2.0, the installation program will automatically download it for you. Since the installation file for Microsoft .Net Framework 2.0 is quite large (23 MB), it might take up to one hour to download if you have a dial-up Internet connection. It takes about 8 minutes to download for a DSL connection.
If you already have Microsoft .Net Framework 2.0 installed on your computer, the installation program will not download it again. It will install Logon Automator only. Since .Net Framework 2.0 is pre-installed with Windows Vista, you will not have to download .Net Framework 2.0 if you have Windows Vista.
You can check whether .Net Framework 2.0 is installed on your computer. If you prefer to download and install Microsoft .Net Framework 2.0 manually, please click here to download and install the Microsoft .Net Framework 2.0 installation file (dotnetfx.exe).
After you have downloaded Logon Automator's installation file, double-click on it to run it. The installation program will first download and install Microsoft .Net Framework 2.0 (if needed). Then it will install Logon Automator.
After performaing the steps above, you will also need to disable Protected Mode in Internet Explorer 7.
Once the installation process is completed, Logon Automator will automatically be launched. If Logon Automator is not launched automatically, you can launch the program by clicking Start, Programs, Logon Automator, Logon Automator. Or you can launch the program by double-clicking on the Logon Automator icon on your desktop.
Registration
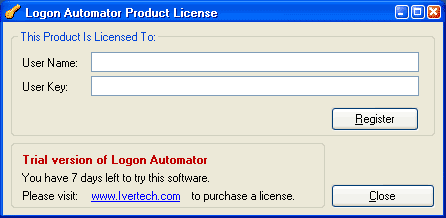
When Logon Automator first starts up, a Product License form will be displayed. If you do not have a User Name and a User Key, you can purchase them by clicking on the Buy Now link. After you purchase your User Name and User Key, you can enter them in the text boxes and click on the Register button. If you do not have the User Name and User Key but would like to try the program, click on the Close button to close the Product License form. You can use the trial version of Logon Automator for 7 days. If you would like to continue using the product after 7 days, you will need to purchase a license from us.
Make sure that you are connected to the Internet when you register. The registration process cannot be initiated if you are not connected to the Internet. If you get any errors during registration, you might want to try turning off any firewalls if they are on. You can turn them back on after you register. If you or your ISP (Internet Service Provider) is using proxy server to connect to the Internet, you might get an error during the registration process. The registration screen will then prompt you for the proxy server name and port number. If your proxy server requires a user name and password, you can enter them there too.
You can use the User Name and User Key only once. The User Name and User Key cannot be re-used after you have registered with us. Please do not share them with others. If you need to move your license from one computer to another, you can perform the "un-registration" process. To un-register your license, you will need to go to Help, License Information menu item on the main screen. Click on the "Unregister" button and your license will be removed from your current computer. Make sure that you are connected to the Internet when you un-register. After the un-registration process is completed successfully, you can then register the product on a different computer.
If your computer crashes and you need to re-register the program on your computer after you reformat your hard drive, you can write us an email with your User Name and we will reactivate your license for you.
Set Up Master Password
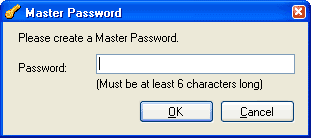
Before you can use Logon Automator, you need to set up a Master Password that protects your sensitive logon information from anyone who has access to your computer. Once your Master Password is set up, you will be prompted to type in the password every time you run Logon Automator. You can turn off the prompting of Master Password if you are the only user who has access to your computer. This can be done in the Tools, Options menu. This will be explained later.The Master Password that you enter cannot be shorter than 6 characters. You can use either alphabets or numbers in the Master Password. Here’s how the "Create Master Password" screen looks like:
You will then be prompted to confirm your password:
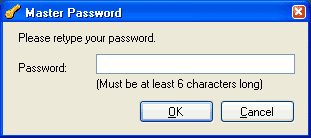
Type in the same password and click on OK. After you have confirmed your Master Password, please remember it or write it down and store it in a secured place. If you lose the Master Password, we will not be able to retrieve it for you. You are the only person who knows the password. This is for your own security protection. If a computer hacker is able to break into your computer and steal your logon information, he will not be able to view your web site accounts' passwords without your Master Password. All the hacker sees are meaningless encrypted strings similar to one of these: "HFw1J4AJIsIaV0s6rLd1Qw=="
It is your responsibility to keep your Master Password private and confidential. Do not share your Master Password with anyone. If you are sharing a computer with someone else, you should always log out before leaving a site to protect access to your information from subsequent users. Ivertech will not be responsible for your loss due to your own negligence.
Main Form
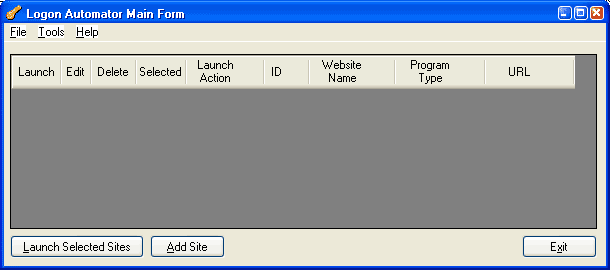
The Main screen has some menu items on top, a grid that displays all the web sites that you have set up, a "Launch Selected Sites" button, and an "Add Site" button. Since you do not have any web sites set up, the grid will be empty. Go ahead and click on the "Add Site" button.
Logon Details Form
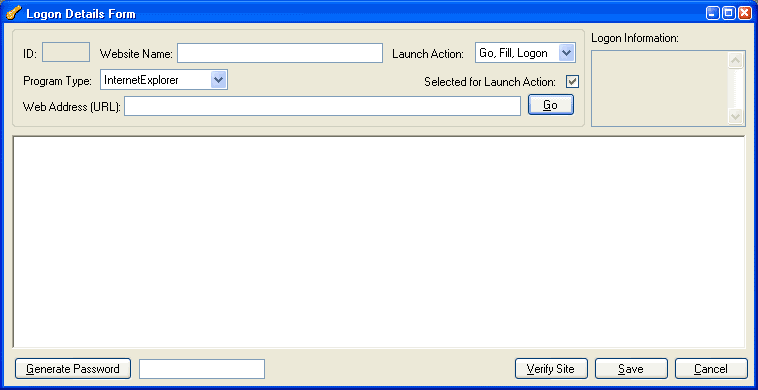 Click to enlarge
Once the "Add Site" button is clicked, the Logon Details form will be displayed. The ID field is disabled since this is a sequence number generated by the system. Go ahead and type in the Website Name. Let’s say you are trying to set up logon information for your Hotmail account. You can type in "Hotmail" for the Website Name.
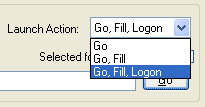
There is a drop down box called Launch Action next to the Website Name. There are 3 options in the Launch Action drop down box:
- "Go" – Automatically go to the web site only. It does not set the user name and password fields and it does not click on the Logon button on the page.
- "Go, Fill" – Automatically go to the web site and fill out the user, passwords, and any other fields that you have filled out or options that you have selected on the page. However, it does not click on the Logon button on the page.
- "Go, Fill, Logon" – Automatically go to the web site, fill out the logon information, and click on the Logon button.
Leave the default Launch Action option as "Go, Fill, Logon". For Program Type, leave "Internet Explorer" as the default. Leave the Selected for Launch Action checkbox as checked. Go ahead and type in www.hotmail.com in the Web Address (URL) text box. Click on the "Go" button and wait for the site to load on the screen.
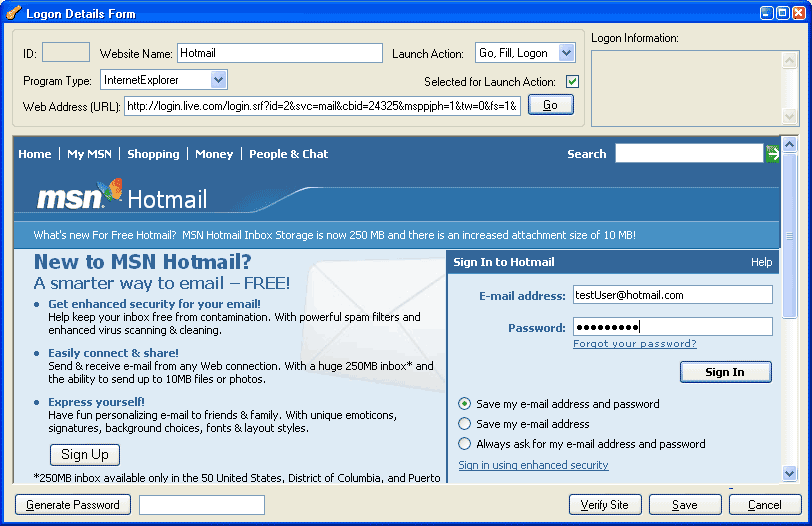 Click to enlarge
Once the site is loaded, make sure that you are not currently logged on to Hotmail. If you are currently logged on to Hotmail, click on the "Sign Out" link on the top right corner of the page. Go to Hotmail’s main logon page by clicking on the "Hotmail" link. Type in your E-mail address and password and choose one of the options available on the screen (Logon Automator will remember these fields). DO NOT click on the "Sign In" button on the page. Logon Automator will not be able to remember your user name and password if you click on the "Sign In" button on the page. At this point, you can either click on the "Verify Site" button or "Save" button on the lower right corner of the screen. If you click on the "Verify Site" button, Logon Automator will bring up a new instance of Internet Explorer, fill out the E-mail address, password, and select one of the options that you selected on the page. It will then click on the "Sign In" button for you. If you are able to successfully log on to Hotmail, that means the logon information that you typed in are valid. You can go back to the Logon Details Form and click on the "Save" button on the lower right corner. Logon Automator will save all your logon information and bring you back to the Main Form.
Main Form
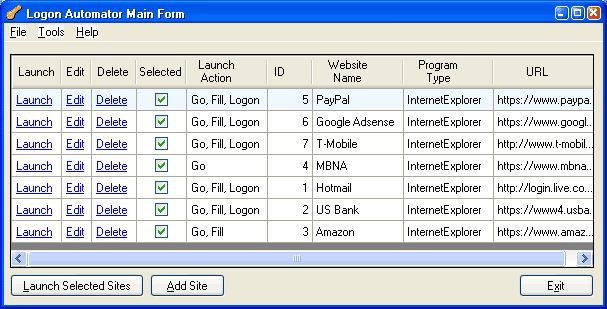
You can add unlimited numbers of sites to Logon Automator. You can check or uncheck the "Selected" check boxes in the grid without clicking on the "Edit" link. You can also change the "Launch Action" in the grid. All other fields in the grid are not editable. You will have to click on the "Edit" link to edit the other fields.
Launch Selected Sites
You can launch all the sites that you have selected by clicking on the "Launch Selected Sites" button on the lower left corner of the screen. To select the sites that you want to launch, you can check on the checkbox in the "Selected" column on the grid. Once you have selected all the sites that you would like to launch simultaneously, just click on the "Launch Selected Sites" button and all your selected sites will be launched.
Sorting of Grid
The grid is currently sorted by Website Name. You can sort the grid by clicking on the column header. For example, if you would like to sort the grid by ID, you can just click on the ID column header. You can change the sorting order (either ascending or descending) by clicking on the same column header twice. The sorting column and sorting order is remembered by Logon Automator and will be applied to the grid the next time you run the program.
Launch Action
You can click on the "Launch" link on the grid to launch an individual web site. If the Launch Action is set to "Go", a new instance of Internet Explorer will be launched and you will automatically be brought to the corresponding site. If the Launch Action is set to "Go, Fill", you will be brought to the site and the user name, password, and any other options that you have selected will be filled out automatically. If the Launch Action is set to "Go, Fill, Logon", all your logon information will automatically be filled, and Logon Automator will log on for you. You can change the Launch Action setting on the grid without clicking on the "Edit" link. Just click on the Launch Action cell and a drop down menu will be displayed. Select your desired Launch Action and click away from the cell to save your selection.
Delete
If you need to delete a site that you have previously set up, you can click on the Delete link on the grid.
Edit
To make changes to an existing site, click on the Edit link on the grid. It is very unlikely that you will need to edit a site once you have set it up, unless if the webmaster of the site changes the names of the text boxes on the page or the web address of the site has been changed. When you click on the Edit link, the Logon Details Form will be brought up. It will take a few seconds for the site to load. Once the site is finished loading, the user name, password, and any other options that you have selected previously will automatically be set.
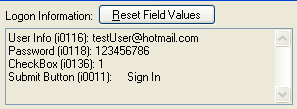
If the fields are not set, you can reset them by clicking on the Reset Field Values button on the top right corner of the screen. If the fields are still not set after pressing the Reset Field Values button, that means the webmaster of the page has changed the page. You will need to retype your logon information again and click on "Verify Site" button to verify your entries or "Save" button to save the information. If you do not remember your logon information, you can refer to the Logon Information section on the top right corner of the screen. You can just copy the user name and password there and paste them to the page.
Logon Details Form
Program Type

The Program Type dropdown menu on the Long Details Form has 2 options. The first option is "Internet Explorer." Choose this option if you are trying to set up your logon for a web site. The second option is "Other." Choose this option if you want to use Logon Automator to run programs that are currently installed on your computer. For example, if you want to run Notepad, you can just type in Notepad in the "File Location" text box. Some examples of programs that you can type in the "File Location" text box are: calc (Calculator), Outlook (Microsoft Outlook), Winword (Microsoft Word), Excel (Microsoft Excel), Explorer (Windows Explorer), etc. If the program that you want to run is not listed above, you can type in the whole path that points to the program’s executable file (exe). For example, if you want to run a program called Skype that is located at C:\Program Files\Skype\Phone\Skype.exe, you can just type in C:\Program Files\Skype\Phone\Skype.exe in the "File Location" text box.
Parameter

The Parameter text box is displayed when the "Other" program type is selected. This is used to pass in parameters to the program that you are trying to run. For example, if you want to open up a Word document located at c:\My Documents\Resume.doc, you can type in Winword in the "File Location" text box and c:\My Documents\Resume.doc in the parameter text box. This tells Logon Automator to use Microsoft Word to open a file located at c:\My Documents\Resume.doc. An alternate way of doing this is to type in c:\My Documents\Resume.doc in the "File Location" text box and leave the "Parameter" text box empty. Logon Automator will know to open Resume.doc with Microsoft Word if the .doc file type is currently associated with Microsoft Word on your computer.
Generate Password

There is a "Generate Password" button on the lower left corner. Click on the button to generate passwords that are random and difficult to guess. Now that Logon Automator will remember all your passwords for you, it is OK to use passwords that are difficult to guess and remember. Once the password has been generated, you can highlight the password, right-click and choose "Copy". You can then paste it to the password field on the site where you are trying to set up a new account. If you do not like the password that you see, you can click on the button again to generate a new one.
Main Form Tools Menu
Disable Prompting of Master Password
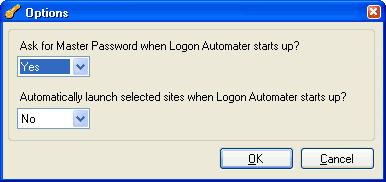
If your computer is secured and you are confident that no one can gain access to it, you can disable the prompting of Master Password every time your run Logon Automator. To disable prompting of Master Password, go to Tools, Options, and select "No" for the "Ask for Master Password when Logon Automator starts up" option. Click on "OK" to confirm the change.
Automatically Launch Selected Sites during Startup
You can tell Logon Automator to automatically launch all selected sites every time you log on to Logon Automator, without clicking on the "Launch Selected Sites" button. To set this option, go to Tools, Options, and select "Yes" for the "Automatically launch selected sites when Logon Automator starts up" option. Click on "OK" to confirm the change.
Change Master Password
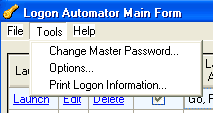
If you need to change your Master Password, go to Tools menu and choose "Change Master Password." You will be prompted to enter you current password, your new password, and confirm your new password.
Print Logon Information
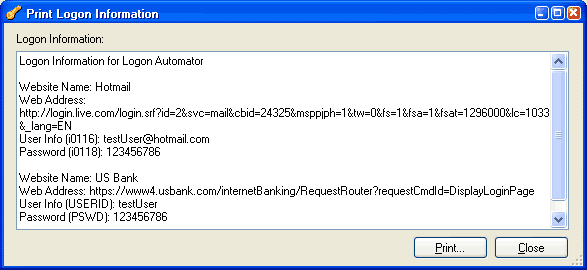
If you need to view or print all your logon information, you can go to Tools, Print Logon Information. You can copy all the logon information and save it to a text file or you can click on the Print button to send it to the printer. The program will prompt you to re-enter your Master Password. This is to prevent your logon information from being viewed by an unauthorized user.
Help
If you need help using Logon Automator, click on the Help menu on the main screen and choose User's Guide menu item. You need to have Internet connection to view the online User's Guide.Uninstallation
If for any reason you need to uninstall Logon Automator, you can go to Start, Programs, Logon Automator, Uninstall Logon Automator. Follow the instructions to uninstall Logon Automator.| Supported Hardware |
| Intel/AMD processor. |
| Supported Operating Systems |
|
Microsoft Windows 11 Microsoft Windows 10 Microsoft Windows 8 Microsoft Windows 7 Microsoft Windows Vista Microsoft Windows XP |
