QuickResizerAPI User's Guide

Introduction
QuickResizerAPI (QuickResizer Application Program Interface) resizes and
converts image files in batches. It is a convenient tool to quickly
shrink your picture files to a smaller size before sending them via email or
posting them on the Web. It saves you time from having to open each file
individually in a graphic software, resize it, and then save it. You can
choose to resize your picture files by percent or by width and height.
You can also convert the file formats in batches. Formats available are:
JPG, GIF, BMP, PNG, and TIF.
QuickResizerAPI is a tool for advanced users and programmers. It extends the
functionalities of QuickResizer. It has all the features that QuickResizer
offers plus more. QuickResizerAPI is callable by any .Net languages (C#, VB
.Net, Managed C++, etc). It can also be called from DOS. QuickResizerAPI has a
very simple interface and it can generate sample code for you.
Installation
The installation file can be downloaded from our QuickResizerAPI Download page. After you have downloaded the file to your computer, double-click on it to start installation.
Once the installation process is completed, you can launch QuickResizerAPI by clicking Start, Programs, QuickResizerAPI, QuickResizerAPI. Or you can launch the program by double-clicking on the QuickResizerAPI icon on your desktop.
Registration
When QuickResizerAPI first starts up, a Product License form will be displayed. If you do not have a User Name and a User Key, you can purchase them by clicking on the QuickResizerAPI Buy Now link. After you purchase your User Name and User Key, you can enter them in the text boxes and click on the Register button. If you do not have the User Name and User Key but would like to try the program, click on the Close button. You can resize up to 20 picture files using this free trial version.
Make sure that you are connected to the Internet when you register. The
registration process cannot be initiated if you are not connected to the
Internet. If you get any errors during registration, you might want to try
turning off any firewalls if they are on. You can turn them back on after you
register. If you or your ISP (Internet Service Provider) is using proxy server
to connect to the Internet, you might get an error during the registration
process. The registration screen will then prompt you for the proxy server name
and port number. If your proxy server requires a user name and password, you
can enter them there too.
You can use the User Name and User Key only once. The User Name and User Key
cannot be re-used after you have registered with us. Please do not share them
with others. If you need to move your license from one computer to another, you
can perform the "un-registration" process. To un-register your license, you
will need to go to Help, License Information menu item on the main screen.
Click on the "Unregister" button and your license will be removed from your
current computer. Make sure that you are connected to the Internet when you
un-register. After the un-registration process is completed successfully, you
can then register the product on a different computer.
If your computer crashes and you need to re-register the program on your
computer after you reformat your hard drive, you can write
us an email with your User Name and we will reactivate your license for
you.

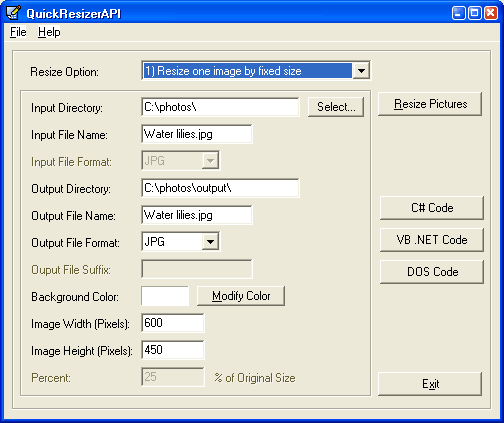
The next screen is the main screen for QuickResizerAPI. You can set your resize options and test them here. You can also generate sample code that shows you how to call the QuickResizerAPI.dll, using the settings that you specify on the form. Please note that it is not necessary to run this form to resize pictures. It is merely a testing tool to help you with your development process.
Simple API (Application Program Interface)
QuickResizerAPI has a very simple interface. Since it is written with C# .Net language, you can call it from any .Net languages (C#, VB .Net, Managed C++, etc). After you have installed QuickResizerAPI on your computer, open up your project solution from your Visual Studio .Net IDE. From your IDE, right click on References under your project, select "Add References..." and click on the "Browse..." button to browse to the QuickResizerAPI.dll. Unless you specify a different installation path, the QuickResizerAPI.dll should be found in the folder C:\Program Files\QuickResizerAPI\.
After a reference has been added to QuickResizerAPI.dll, here is how to call QuickResizerAPI from C#:
QuickResizerAPI.Resizer resizer = new
QuickResizerAPI.Resizer();
resizer.Resize(parameters...);
The parameters that you need to pass in are as follow:
- int resizeOptionID
- string inputDirectory
- string inputFile
- string outputDirectory
- string outputFile
- string inputFileFormat
- string outputFileFormat
- string outputFileSuffix
- int backGroundColorID
- int imageWidthInPixels
- int imageHeightInPixels
- int percent
resizeOptionID
resizeOptionID is an integer and there are 4 possible values for
resizeOptionID:
- 1 - Resize one image by fixed size
- 2 - Resize one image by percent
- 3 - Resize multiple images by fixed size
- 4 - Resize multiple images by percent
If you choose to resize by fixed size, you will have to pass in the imageWidthInPixels and imageHeightInPixels. If you choose to resize by percent, you will have to pass in the percent value.
When you choose a certain resize option from the combo box, the ignored fields on the form will be disabled. When you click on any of the buttons to generate sample code, you will see that empty strings or dummy integers will be passed in for parameters that are not applicable to the resize option that you choose.
inputDirectory
inputDirectory is a string that specifies the full path to the images that you
need to resize. This parameter is always required regardless of which resize
option you choose.
inputFile
inputFile is a string that specifies the name of the image file that you need
to resize. Since this parameter is ignored when you resize multiple images, you
can pass in empty string ("") when you choose resize option 3 and 4.
outputDirectory
outputDirectory is a string that specifies the full path to the directory where
your resized images will be saved to. The outputDirectory can be the same as
inputDirectory. The consequence is that your original image files will be
overwritten if you do not specify the outputFileSuffix. This parameter is
always required regardless of which resize option you choose.
outputFile
outputFile is a string that specifies the name of the resized image file. Since
this parameter is ignored when you resize multiple images, you can pass in
empty string ("") when you choose resize option 3 and 4.
inputFileFormat
inputFileFormat is a string that specifies the file format of the original
image file. Possible values for this parameter are "BMP", "GIF", "JPG", "PNG",
and "TIF". Since this parameter is ignored when you resize one image at a time,
you can pass in empty string ("") when you choose resize option 1 and 2.
Please note that QuickResizerAPI does not support resizing
of multi-page TIFF or animated GIF images. It only resizes the first frame of the image.
The rest of the frames will be lost.
outputFileFormat
outputFileFormat is a string that specifies the file format of the resized
image file. Possible values for this parameter are "BMP", "GIF", "JPG", "PNG",
and "TIF". This parameter is always required regardless of which resize option
you choose.
outputFileSuffix
outputFileSuffix is a string that specifies suffix to be added to the resized
image file name. For example, you have a picture file called
VacationPicture.JPG that you would like to resize and rename to
VacationPicture_Small.JPG, you can pass in "_Small" for the outputFileSuffix
parameter. This parameter will be ignored when you resize one image at a time
because the output file name is already specified in the outputFile parameter.
backGroundColorID
backGroundColorID is an integer that specifies the color ID of the 32-bit ARGB
value. When you choose to resize by fixed size, QuickResizerAPI will not
stretch your picture out of proportion to fit into the width and height that
you specify. It will resize your picture proportionally to the original width
and height. For left-over space that it cannot fill, it will leave it as the
backGroundColorID that you specify. backGroundColorID can be a positive or
negative value. To find the value of the backGroundColorID, you can click on
the "Modify Color" button and choose a color, then click on any of the buttons
that generate sample code. You will be able to find the backGroundColorID
there.
imageWidthInPixels
imageWidthInPixels is a positive integer that specifies the resized image width
in Pixels. This parameter is ignored when you choose to resize by percent.
imageHeightInPixels
imageHeightInPixels is a positive integer that specifies the resized image
height in Pixels. This parameter is ignored when you choose to resize by
percent.
percent
percent is a positive integer that specifies the size percent of the resized
image. For example, if you would like to shrink your picture to 25% of its
original size, pass in 25 as the percent parameter. If you would like to
enlarge your picture to 25% of its original size, pass in 125 for the percent
parameter. This parameter is ignored when you choose to resize by fixed size.
Sample Code

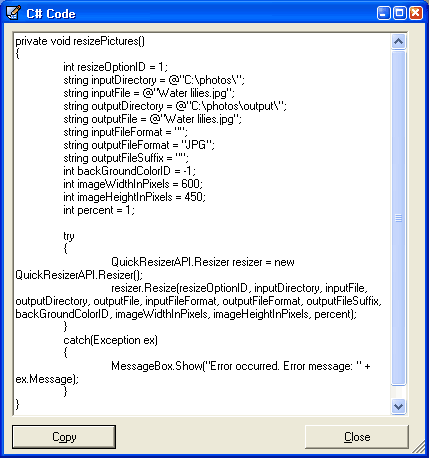
If you are having problem calling the QuickResizerAPI from your program, you can click on the "C# Code", "VB .NET Code", or "DOS Code" buttons. You will need to fill out all the required fields before generating the sample code. QuickResizerAPI will display a warning message if you do not fill out all required fields for the resize option that you choose. Once the sample code is generated, you can copy it from the window (by pressing the "Copy" button and paste it to your code.
Below are sample codes generated for C#, VB .NET, and DOS:
C# Code
private void resizePictures(){
int resizeOptionID = 1;
string inputDirectory = @"C:\photos\";
string inputFile = @"Water lilies.jpg";
string outputDirectory = @"C:\photos\output\";
string outputFile = @"Water lilies.jpg";
string inputFileFormat = "";
string outputFileFormat = "JPG";
string outputFileSuffix = "";
int backGroundColorID = -1;
int imageWidthInPixels = 600;
int imageHeightInPixels = 450;
int percent = 1;
try
{
QuickResizerAPI.Resizer resizer = new QuickResizerAPI.Resizer();
resizer.Resize(resizeOptionID, inputDirectory, inputFile, outputDirectory, outputFile, inputFileFormat, outputFileFormat, outputFileSuffix, backGroundColorID, imageWidthInPixels, imageHeightInPixels, percent);
}
catch(Exception ex)
{
MessageBox.Show("Error occurred. Error message: " + ex.Message);
}
}
VB .NET Code
Private Sub resizePictures()Dim resizeOptionID As Integer = 1
Dim inputDirectory As String = "C:\photos\"
Dim inputFile As String = "Water lilies.jpg"
Dim outputDirectory As String = "C:\photos\output\"
Dim outputFile As String = "Water lilies.jpg"
Dim inputFileFormat As String = ""
Dim outputFileFormat As String = "JPG"
Dim outputFileSuffix As String = ""
Dim backGroundColorID As Integer = -1
Dim imageWidthInPixels As Integer = 600
Dim imageHeightInPixels As Integer = 450
Dim percent As Integer = 1
Try
Dim resizer As New QuickResizerAPI.Resizer
resizer.Resize(resizeOptionID, inputDirectory, inputFile, outputDirectory, outputFile, inputFileFormat, outputFileFormat, outputFileSuffix, backGroundColorID, imageWidthInPixels, imageHeightInPixels, percent)
Catch ex As Exception
MsgBox("Error occurred. Error message: " + ex.Message)
End Try
End Sub
DOS Code
"C:\\Program Files\\QuickResizerAPI\\QuickResizerApiExe.exe" 1 "C:\\photos\\" "Water lilies.jpg" "C:\\photos\\output\\" "Water lilies.jpg" "" "JPG" "" -1 600 450 1Please note that you cannot call QuickResizerAPI.dll directly from DOS. You will have to call QuickResizerApiExe.exe instead. QuickResizerApiExe.exe will forward your call to QuickResizerAPI.dll. You can call QuickResizerApiExe.exe either directly from the DOS command window or you can shell out of your program and invoke the DOS command.
Help
If you need help using QuickResizerAPI, click on the Help menu on the main screen and choose User's Guide menu item. You need to have Internet connection to view the online User's Guide.
Uninstallation
If for any reason you need to uninstall QuickResizerAPI, you can go to Start, Programs, QuickResizerAPI, and choose Uninstall QuickResizerAPI. Another way of uninstalling is by going to Start, Settings, Control Panel, and double-click on the "Add or Remove Programs" icon. Locate and click on the QuickResizerAPI item and click on the "Change/Remove" button on the right. Follow the instructions to uninstall QuickResizerAPI.
| Supported Hardware |
| Intel/AMD processor. |
| Supported Operating Systems |
|
Microsoft Windows 11 Microsoft Windows 10 Microsoft Windows 8 Microsoft Windows 7 Microsoft Windows Vista Microsoft Windows XP |

