When you resize images, most of the time you want to maintain aspect ratio.
Maintaining aspect ratio is also known as "constraining proportions" in some graphic editing software (like Photoshop). It
basically means that the width and height of the resized picture is enlarged/shrunk to proportion, so that the image does not look distorted after it has been resized.
For example, let's say we have a photo of 200 x 200 pixels (200 pixels in width and 200 pixels in height):

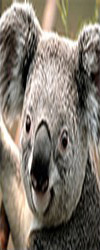
If you were to try to resize the photo above from 200 x 200 pixels to 100 x 250 pixels, you will need to turn off "maintain aspect ratio" (or "constrain proportions"), and your resized photo will look like this:

What if you actually want your image file dimension to be 100 x 250 pixels, but at the same time you want your image to be resized according to aspect ratio?
One of the neat features that QuickResizer has that most resizers do not is the ability to resize to aspect ratio while accepting width and height that cannot be resized proportionally. For example, if you were to tell QuickResizer to resize the same image from 200 x 200 pixels to 100 x 250 pixels, here's what the resized picture will look like:

QuickResizer is smart enough to figure out that an image with 200 x 200 pixels cannot be proportionally resized to 100 x 250 pixels. So it resizes it to 100 x 100 pixels. Since the Heigth was specified as 250 pixels, QuickResizer fulfills the requirement by adding 75 pixels of black background to the top and bottom of the resized picture (75 + 100 + 75 = 250 pixels). Now, you have a picture that is resized proportionally, but with added "left-over" background space to satisfy the Height requirement (250 pixels).
The default background color for QuickResizer is actually white. I set it to black so that you can see the black background in this demonstration. Here's how you can change the background color to fill the "left-over" space when your image cannot be resize/scaled proportionally:
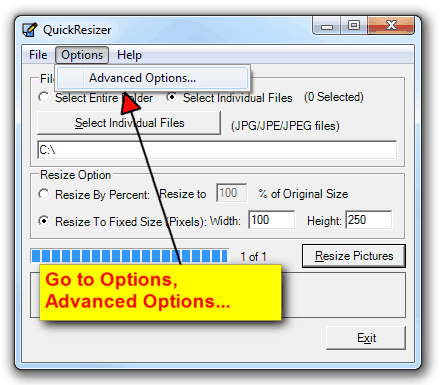
1) Go to Options, Advanced Options:

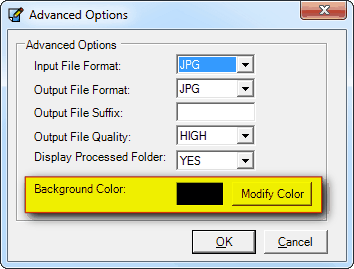
2) Click on the "Modify Color" button to bring up the color palette:

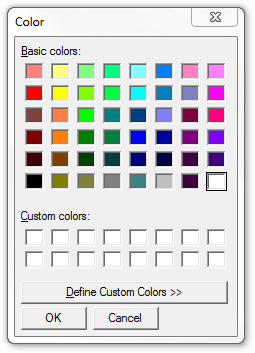
3) Choose any color you prefer as your background color and click on the OK button:

This feature is very useful when you need to display resized thumbnail images on your website and the original images are of various widths and heights. To make the thumbnail images uniform, you just tell QuickResizer to resize all the image files in the folder to the width and height that you specify.
Here's how your thumbmail page would look like if you use MS Paint or Photoshop to resize the images to 100 x 250 pixels:
Here's how your thumbmail page would look like if you use QuickResizer to resize the images to 100 x 250 pixels:
The images resized by QuickResizer look a lot better because they are resized to aspect ratio, not distorted like the ones resized by Photoshop.
Go ahead, click on the button below to find out how QuickResizer can save you hours of manual work in resizing images:
Show Me How To Resize Multiple Pictures With Aspect Ratio
For example, let's say we have a photo of 200 x 200 pixels (200 pixels in width and 200 pixels in height):

If you were to try to resize the photo above from 200 x 200 pixels to 100 x 250 pixels, you will need to turn off "maintain aspect ratio" (or "constrain proportions"), and your resized photo will look like this:

What if you actually want your image file dimension to be 100 x 250 pixels, but at the same time you want your image to be resized according to aspect ratio?
One of the neat features that QuickResizer has that most resizers do not is the ability to resize to aspect ratio while accepting width and height that cannot be resized proportionally. For example, if you were to tell QuickResizer to resize the same image from 200 x 200 pixels to 100 x 250 pixels, here's what the resized picture will look like:

QuickResizer is smart enough to figure out that an image with 200 x 200 pixels cannot be proportionally resized to 100 x 250 pixels. So it resizes it to 100 x 100 pixels. Since the Heigth was specified as 250 pixels, QuickResizer fulfills the requirement by adding 75 pixels of black background to the top and bottom of the resized picture (75 + 100 + 75 = 250 pixels). Now, you have a picture that is resized proportionally, but with added "left-over" background space to satisfy the Height requirement (250 pixels).
The default background color for QuickResizer is actually white. I set it to black so that you can see the black background in this demonstration. Here's how you can change the background color to fill the "left-over" space when your image cannot be resize/scaled proportionally:
1) Go to Options, Advanced Options:

2) Click on the "Modify Color" button to bring up the color palette:

3) Choose any color you prefer as your background color and click on the OK button:

This feature is very useful when you need to display resized thumbnail images on your website and the original images are of various widths and heights. To make the thumbnail images uniform, you just tell QuickResizer to resize all the image files in the folder to the width and height that you specify.
Here's how your thumbmail page would look like if you use MS Paint or Photoshop to resize the images to 100 x 250 pixels:

|

|

|

|
Here's how your thumbmail page would look like if you use QuickResizer to resize the images to 100 x 250 pixels:

|

|

|

|
The images resized by QuickResizer look a lot better because they are resized to aspect ratio, not distorted like the ones resized by Photoshop.
Go ahead, click on the button below to find out how QuickResizer can save you hours of manual work in resizing images:
Show Me How To Resize Multiple Pictures With Aspect Ratio
