Have you recently upgraded your operating system from Windows 7 to Windows 11? If you have, you are going to find out that File Explorer displays your
image files quite differently from the way it used to.
Let's have a crash course on the "Orientation" tag in an image file before we explain what the issue is.
When you take pictures with your iPhone, iPad, Android, or digital cameras, there is an invisible tag called "Orientation" that is stored in the JPG files. This Orientation flag describes how many degrees the camera was rotated when the picture was taken. There are 4 possible values for the Orientation flag:
We didn't used to pay much attention to this Orientation flag when we tried to edit or resize the images in older versions of Windows (XP, Vista, Windows 7), because the images would have been displayed exactly as described by the Orientation flag. For example, if a photo was taken with Orientation flag of "Rotate 90 degrees", it would be displayed as 90 degrees rotated in File Explorer:
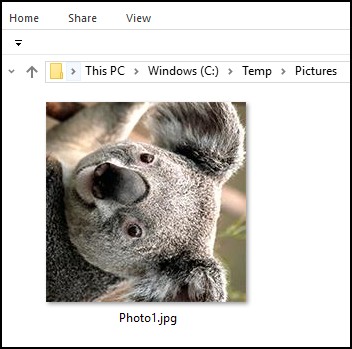
When editing or resizing this particular image in Windows, we would know to rotate it 90 degrees anti-clockwise, so that when it's uploaded to a website, it would be displayed correctly.
There's really no need for us to see the "Orientation" flag in the JPG file because we can visually see how the picture has been rotated in File Explorer.
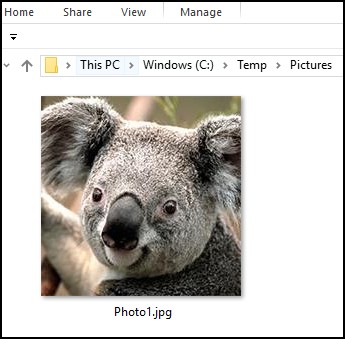
This completely changed for those who have upgraded to newer versions of Windows (Windows 8, Windows 10, or Windows 11). Microsoft has built in some intelligence in Windows 11 so that the photos are always auto-rotated (on the fly) to the "Normal" view in File Explorer. For example, a photo that was taken with "Rotate 90 degrees" will show up as not rotated in File Explorer and we would not have known to rotate it:
We would happily upload it to Facebook or Ebay, only to find out that it was rotated sideways on the website:
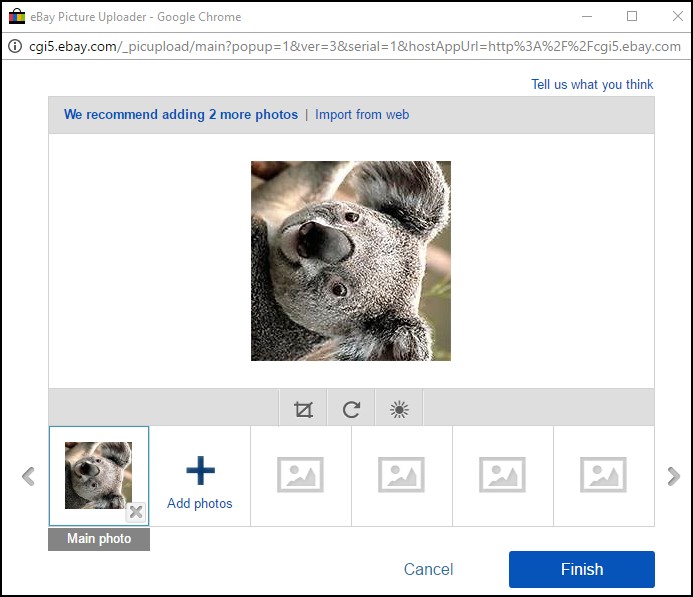
The reason is because when the photo is handed over to a foreign server (be it a website, email server, etc), Windows maintains the original state of the photo (which was rotated 90 degrees clockwise). It's up to the foreign server to honor the Orientation flag and rotate the photo accordingly (90 degrees anti-clockwise) so that it would be displayed correctly. Since most foreign servers do not observe this Orientation flag, the photo is displayed in its original state (rotated sideways). The photo would look "Normal" when viewed in File Explorer because the operating system creates this "illusion" (by rotating the photo 90 degrees anti-clockwise on the fly). In reality, the photo is just sitting there sideways!
This was not a problem for older versions of Windows (XP, Vista, Windows 7) because there was no built-in "smartness" in the operating system to auto-rotate the images to their "Normal" orientation when viewed in File Explorer. We can just eyeball the photos and manually rotate the ones that were rotated sideways. When the photos reach the foreign server, they are displayed just the way they were rotated in Windows. The older versions of Windows provide users with a WYSIWYG (what you see is what you get) view of the photos, while the newer versions of Windows don't. The newer versions of Windows are just too smart for their own good!
To work around this problem in Windows 11, you will need to identify which photos were rotated by looking at the Orientation flag in File Explorer.
Here's how to view the flag:
1) Open File Explorer and browse to the folder where the JPG files are located.
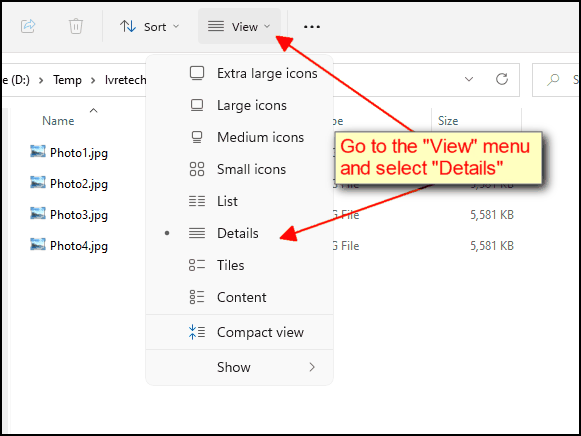
2) Go to the View menu on top and click on Details (or you can just right-click anywhere on the right panel and select View, Details).
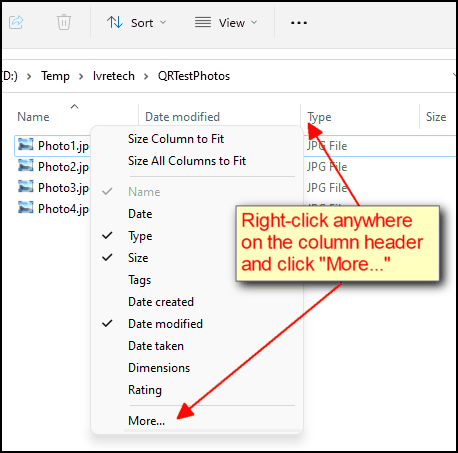
3) Right-click on any of the column headers and click "More..."
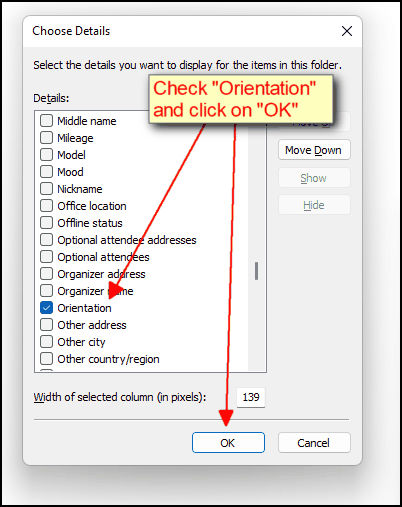
4) Scroll down to Orientation and check the checkbox next to it and click on "OK".
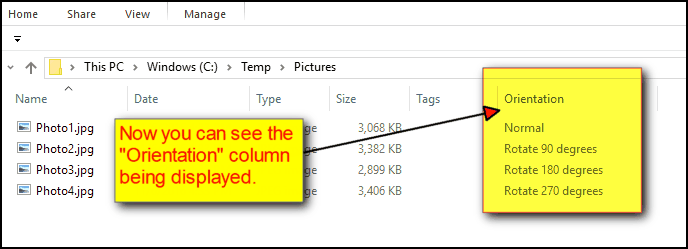
5) The "Orientation" column will be displayed on File Explorer and you will be able to determine which pictures need to be manually rotated.
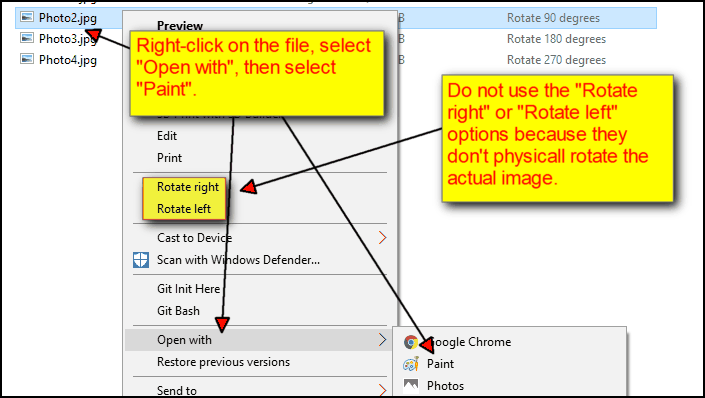
For the images with Orientation of "Normal", you can simply leave them alone. You just need to rotate the ones with Orientation of "Rotate x degrees". You can right click on the jpg file and choose "Open with" and then choose "Paint". (Do not use the "Rotate Right" or "Rotate Left" options as they don't physically rotate the picture file for you. They merely update the Orientation flag, which does not help with our situation.)
Once the file is opened in Paint, you will see that the picture is already in the "Normal" orientation:
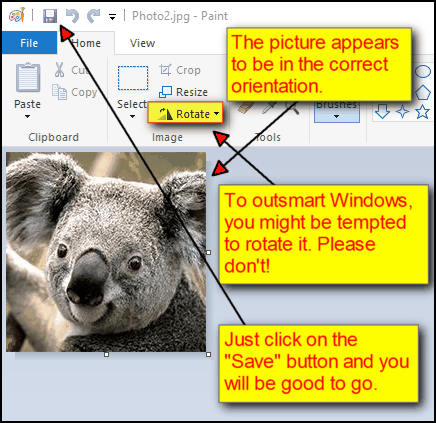
Do not perform any rotation at this point. Just click on the "Save" button at the top left corner. After you have clicked on the "Save" button in Paint, you will see that the "Orientation" flag is now set to Normal:
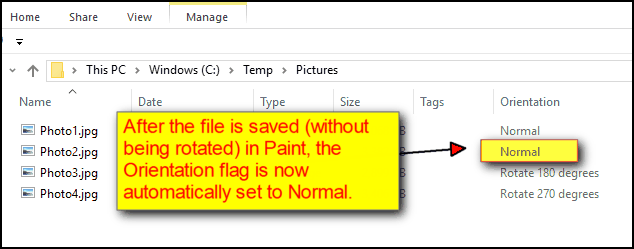
We did not actually rotate the picture in Paint, but just by clicking on the "Save" button, it auto-magically rotated the picture for us and set the Orientation flag to Normal. You can perform other manipulations (like resizing, cropping, retouching) on the image at this point, and it's going to be displayed correctly when you upload it to other websites.
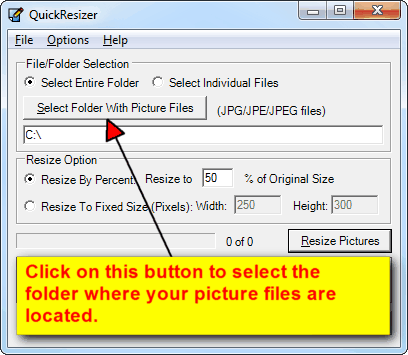
It's not such a big deal if you only have a few pictures to rotate before uploading them to the web. What if you have hundreds or even thousands of photos to rotate? It's not practical to have to open each one in Paint and save it. This is when you will need a tool like QuickResizer to help you with this tedious process. QuickResizer has a built-in auto-rotate function where JPG files are automatically rotated to the correct orientation. There's no need to open, rotate, resize, and save each image in Paint or Photoshop. Just select a folder where the JPG files are located and click on the "Resize Pictures" button:
QuickResizer will resize and rotate all of the images for you! If you just want to rotate your images (without resizing), simply set the "Resize By Percent" to 100%.
Go ahead, click on the button below to download this image resizer with auto-rotate function that can save you hours of manual work in resizing and rotating images:
JPG Resizer with Auto-Rotate Function
Let's have a crash course on the "Orientation" tag in an image file before we explain what the issue is.
When you take pictures with your iPhone, iPad, Android, or digital cameras, there is an invisible tag called "Orientation" that is stored in the JPG files. This Orientation flag describes how many degrees the camera was rotated when the picture was taken. There are 4 possible values for the Orientation flag:
- Normal
- Rotate 90 degrees
- Rotate 180 degrees
- Rotate 270 degrees
We didn't used to pay much attention to this Orientation flag when we tried to edit or resize the images in older versions of Windows (XP, Vista, Windows 7), because the images would have been displayed exactly as described by the Orientation flag. For example, if a photo was taken with Orientation flag of "Rotate 90 degrees", it would be displayed as 90 degrees rotated in File Explorer:

When editing or resizing this particular image in Windows, we would know to rotate it 90 degrees anti-clockwise, so that when it's uploaded to a website, it would be displayed correctly.
There's really no need for us to see the "Orientation" flag in the JPG file because we can visually see how the picture has been rotated in File Explorer.
This completely changed for those who have upgraded to newer versions of Windows (Windows 8, Windows 10, or Windows 11). Microsoft has built in some intelligence in Windows 11 so that the photos are always auto-rotated (on the fly) to the "Normal" view in File Explorer. For example, a photo that was taken with "Rotate 90 degrees" will show up as not rotated in File Explorer and we would not have known to rotate it:

We would happily upload it to Facebook or Ebay, only to find out that it was rotated sideways on the website:

The reason is because when the photo is handed over to a foreign server (be it a website, email server, etc), Windows maintains the original state of the photo (which was rotated 90 degrees clockwise). It's up to the foreign server to honor the Orientation flag and rotate the photo accordingly (90 degrees anti-clockwise) so that it would be displayed correctly. Since most foreign servers do not observe this Orientation flag, the photo is displayed in its original state (rotated sideways). The photo would look "Normal" when viewed in File Explorer because the operating system creates this "illusion" (by rotating the photo 90 degrees anti-clockwise on the fly). In reality, the photo is just sitting there sideways!
This was not a problem for older versions of Windows (XP, Vista, Windows 7) because there was no built-in "smartness" in the operating system to auto-rotate the images to their "Normal" orientation when viewed in File Explorer. We can just eyeball the photos and manually rotate the ones that were rotated sideways. When the photos reach the foreign server, they are displayed just the way they were rotated in Windows. The older versions of Windows provide users with a WYSIWYG (what you see is what you get) view of the photos, while the newer versions of Windows don't. The newer versions of Windows are just too smart for their own good!
To work around this problem in Windows 11, you will need to identify which photos were rotated by looking at the Orientation flag in File Explorer.
Here's how to view the flag:
1) Open File Explorer and browse to the folder where the JPG files are located.
2) Go to the View menu on top and click on Details (or you can just right-click anywhere on the right panel and select View, Details).

3) Right-click on any of the column headers and click "More..."

4) Scroll down to Orientation and check the checkbox next to it and click on "OK".

5) The "Orientation" column will be displayed on File Explorer and you will be able to determine which pictures need to be manually rotated.

For the images with Orientation of "Normal", you can simply leave them alone. You just need to rotate the ones with Orientation of "Rotate x degrees". You can right click on the jpg file and choose "Open with" and then choose "Paint". (Do not use the "Rotate Right" or "Rotate Left" options as they don't physically rotate the picture file for you. They merely update the Orientation flag, which does not help with our situation.)

Once the file is opened in Paint, you will see that the picture is already in the "Normal" orientation:

Do not perform any rotation at this point. Just click on the "Save" button at the top left corner. After you have clicked on the "Save" button in Paint, you will see that the "Orientation" flag is now set to Normal:

We did not actually rotate the picture in Paint, but just by clicking on the "Save" button, it auto-magically rotated the picture for us and set the Orientation flag to Normal. You can perform other manipulations (like resizing, cropping, retouching) on the image at this point, and it's going to be displayed correctly when you upload it to other websites.
It's not such a big deal if you only have a few pictures to rotate before uploading them to the web. What if you have hundreds or even thousands of photos to rotate? It's not practical to have to open each one in Paint and save it. This is when you will need a tool like QuickResizer to help you with this tedious process. QuickResizer has a built-in auto-rotate function where JPG files are automatically rotated to the correct orientation. There's no need to open, rotate, resize, and save each image in Paint or Photoshop. Just select a folder where the JPG files are located and click on the "Resize Pictures" button:
QuickResizer will resize and rotate all of the images for you! If you just want to rotate your images (without resizing), simply set the "Resize By Percent" to 100%.
Go ahead, click on the button below to download this image resizer with auto-rotate function that can save you hours of manual work in resizing and rotating images:
JPG Resizer with Auto-Rotate Function

