While it's quick and easy to resize photos in MS Paint, Photoshop offers more advanced options to resize
your photos. If you have the luxury of using Photoshop, below are instructions on how to resize your photos before emailing or uploading them to the Web:
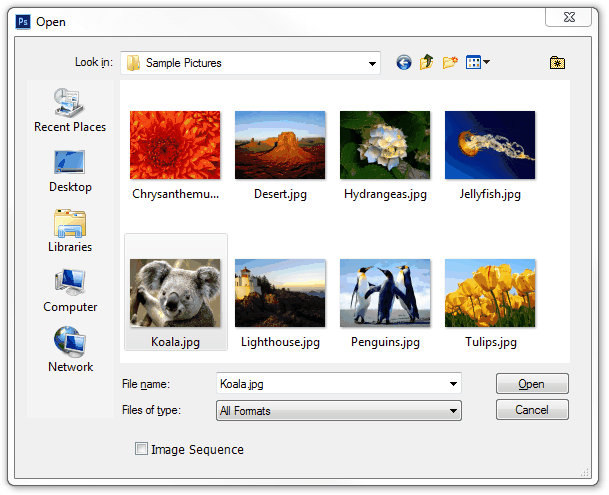
1) Run Adobe Photoshop. Go to File, Open, select the file you want to resize, and click on the Open button:
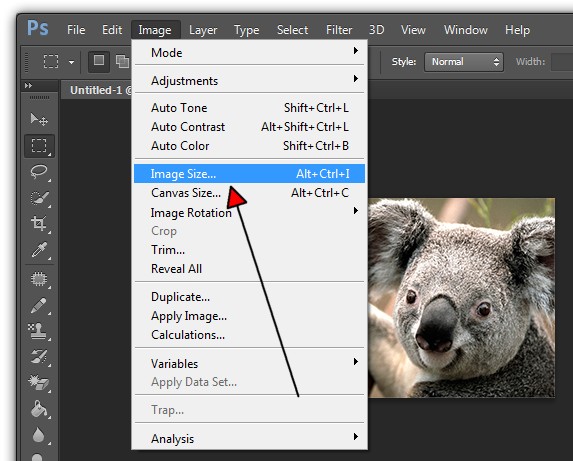
2) Once you have the image file loaded in Photoshop, go to Image menu on top and select Image Size (or you can use the shortcut key Alt-Ctr-I to get to it):
3) The Image Size dialog box will be displayed:
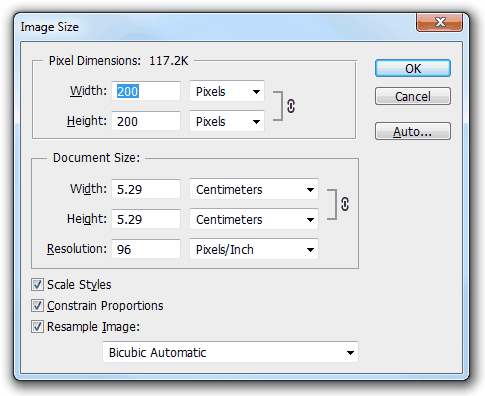
4) In the Pixel Dimensions section, you can specify the Width and Height in Pixels or Percent:

5) Remember to keep the "Constrain Proportions" as checked, so that Photoshop can calculate the Height for you when you enter the Width:
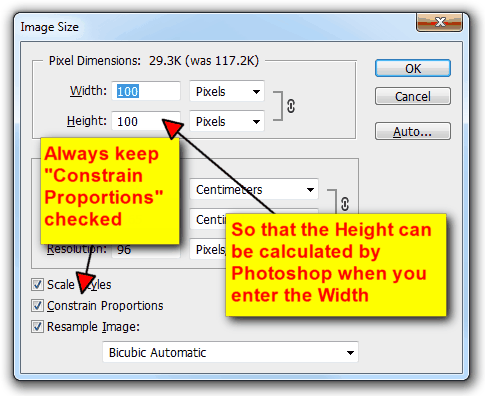
6) In the example above, Photoshop was smart enough to determine that the Height should be 100 pixels when I entered 100 for the Width (original image was 200 x 200 pixels). The "Constrain Proportions" check-box tells Photoshop to resize the image proportionally so that it will not be distorted. When this check-box is checked, you can also enter the Height and Photoshop will figure out the Width for you. Notice that in the Pixel Dimensions section, it also tells you the file size after resize (29.3 KB). The file size before resize was 117.2 KB.
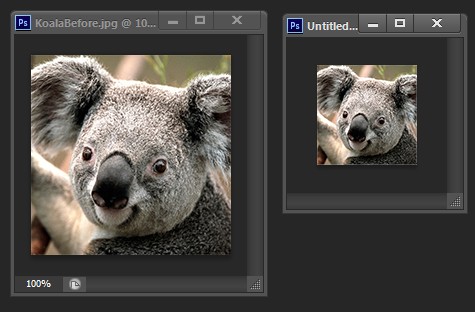
7) Here's a comparison of the pictures before (200 x 200 pixels) and after resized (100 x 100 pixels):
8) If you uncheck the "Constrain Proportions" check-box, Photoshop will allow you to enter any values into the Width and Height. If you enter values that cannot be proportionally resized to, your resized photo will be distorted. Below is how our distorted koala bear picture looks like if we were to resize it from 200 x 200 pixels to 100 x 250 pixels:

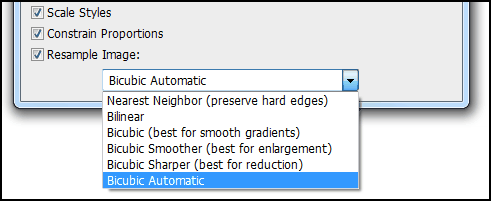
9) You can further optimize your resized image by checking the "Resample Image" check-box and choosing a resampling option that fits your scenario. For example, if you are enlarging your photo, it's best to choose the "Bicubic Smoother" option. If you are shrinking your photos, choose the Bicubic Sharper option. These options tell Photoshop how to best re-organize the pixels as you enlarge/shrink your photos. If you are not sure, just use the default "Bicubic Automatic."
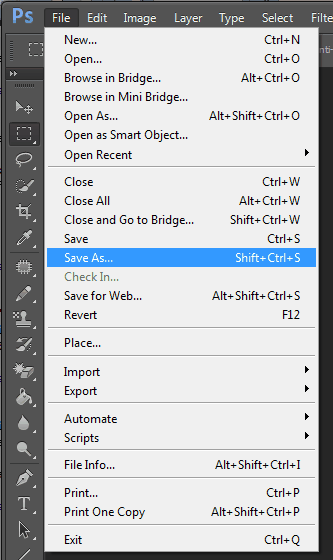
10) Once you are happy with the resized photo, just go to File, Save As, and save the file with a name. Do not use the Save option as it will overwrite the original file:
Below is how the screen looks like:
Just click on the "Select Folder With Picture Files" to tell the resizer where your pictures are located, specify whether you want to resize by percent or by pixels, and click on the "Resize Pictures" button. All the photos in the selected folder will be resized. There's no need to open each individual file and resize them one by one!
Even if you enter pixels that cannot be proportionally resized to, the resizer is smart enough to make the corrections for you according to aspect ratio in the resized files.
Go ahead, click on the button below to learn how this batch image resizer can save you hours of manual work in resizing images:
Show Me How To Resize Multiple Pictures
1) Run Adobe Photoshop. Go to File, Open, select the file you want to resize, and click on the Open button:

2) Once you have the image file loaded in Photoshop, go to Image menu on top and select Image Size (or you can use the shortcut key Alt-Ctr-I to get to it):

3) The Image Size dialog box will be displayed:

4) In the Pixel Dimensions section, you can specify the Width and Height in Pixels or Percent:
5) Remember to keep the "Constrain Proportions" as checked, so that Photoshop can calculate the Height for you when you enter the Width:

6) In the example above, Photoshop was smart enough to determine that the Height should be 100 pixels when I entered 100 for the Width (original image was 200 x 200 pixels). The "Constrain Proportions" check-box tells Photoshop to resize the image proportionally so that it will not be distorted. When this check-box is checked, you can also enter the Height and Photoshop will figure out the Width for you. Notice that in the Pixel Dimensions section, it also tells you the file size after resize (29.3 KB). The file size before resize was 117.2 KB.
7) Here's a comparison of the pictures before (200 x 200 pixels) and after resized (100 x 100 pixels):

8) If you uncheck the "Constrain Proportions" check-box, Photoshop will allow you to enter any values into the Width and Height. If you enter values that cannot be proportionally resized to, your resized photo will be distorted. Below is how our distorted koala bear picture looks like if we were to resize it from 200 x 200 pixels to 100 x 250 pixels:

9) You can further optimize your resized image by checking the "Resample Image" check-box and choosing a resampling option that fits your scenario. For example, if you are enlarging your photo, it's best to choose the "Bicubic Smoother" option. If you are shrinking your photos, choose the Bicubic Sharper option. These options tell Photoshop how to best re-organize the pixels as you enlarge/shrink your photos. If you are not sure, just use the default "Bicubic Automatic."

10) Once you are happy with the resized photo, just go to File, Save As, and save the file with a name. Do not use the Save option as it will overwrite the original file:

What if you want to resize multiple photos?
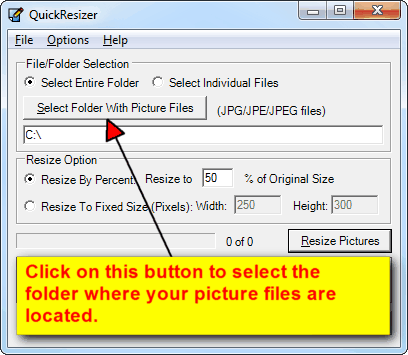
If you have more than dozens of or hundreds of pictures to resize, it will be quite a tedious process to have to go through the steps above to resize them all. You can download our batch image resizer to resize multiple photos for you.Below is how the screen looks like:

Just click on the "Select Folder With Picture Files" to tell the resizer where your pictures are located, specify whether you want to resize by percent or by pixels, and click on the "Resize Pictures" button. All the photos in the selected folder will be resized. There's no need to open each individual file and resize them one by one!
Even if you enter pixels that cannot be proportionally resized to, the resizer is smart enough to make the corrections for you according to aspect ratio in the resized files.
Go ahead, click on the button below to learn how this batch image resizer can save you hours of manual work in resizing images:
Show Me How To Resize Multiple Pictures
