Resizing images can be a repetitive and boring task, when you have hundreds of images with different widths and heights to process.
To save you from having to open each image file, resize it, and save it one by one, you can follow the instructions below to
batch resize all images in a folder using QuickResizer.
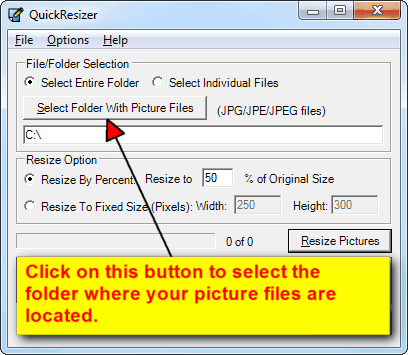
1) Run QuickResizer and select the "Select Entire Folder" option. Click on the "Select Folder With Picture Files" button.

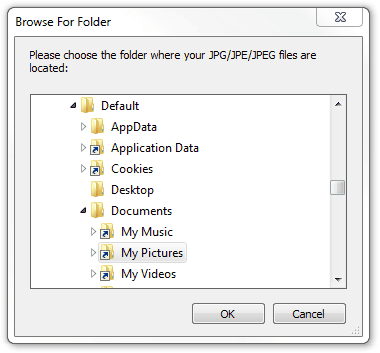
2) Browse to the folder where the images that you want to resize are located and click on "OK":

3) Enter your desired resized dimension (either by percent or by pixels). Please note that your images will be resized according to aspect ratio even if you enter width and height pixels that cannot be resized proportionally.
4) Click on the "Resize Pictures" button and all the images in the folder specified will be resized at once.
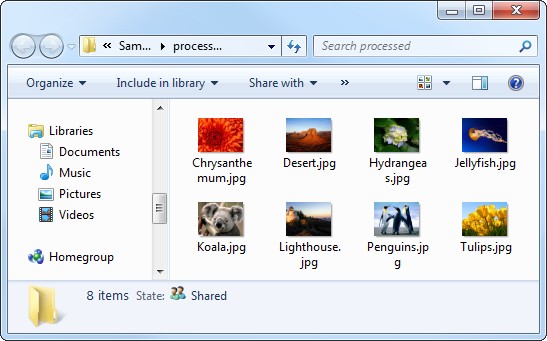
5) A new folder called "processed" will be created under the folder that you specified and your resized photos will be saved there. A new Windows Explorer will be displayed to show the resized files in the "processed" folder:

6) You can now use the resized images in the "processed" folder to email to others or upload them to the web.
No more repetitive and boring resizing task to perform!
Go ahead, click on the button below to download this batch image resizer that can save you hundreds of hours of manual work in resizing images:
Show Me Where To Download QuickResizer
1) Run QuickResizer and select the "Select Entire Folder" option. Click on the "Select Folder With Picture Files" button.

2) Browse to the folder where the images that you want to resize are located and click on "OK":

3) Enter your desired resized dimension (either by percent or by pixels). Please note that your images will be resized according to aspect ratio even if you enter width and height pixels that cannot be resized proportionally.
4) Click on the "Resize Pictures" button and all the images in the folder specified will be resized at once.
5) A new folder called "processed" will be created under the folder that you specified and your resized photos will be saved there. A new Windows Explorer will be displayed to show the resized files in the "processed" folder:

6) You can now use the resized images in the "processed" folder to email to others or upload them to the web.
No more repetitive and boring resizing task to perform!
Go ahead, click on the button below to download this batch image resizer that can save you hundreds of hours of manual work in resizing images:
Show Me Where To Download QuickResizer
